Chapter 10
Chapter 10 overview:
Chapter 10 is a section from the IRIG 106 standard and is a standard used for data collection, storage and useage common with most Department of Defense applications. Chp 10 can be used for commerical use as well as a data standard.
An excerpt from the IRIG 106 sums up the application: There is a need for a digital data acquisition and recording standard that supports a broad range of requirements, including:
- Data download and interface.
- One or more multiplexed data streams.
- One or more single data streams.
- Data format definitions.
- Recorder control.
- Media declassification.
- Data interoperability.
Specifically, this digital recording standard shall be compatible with the multiplexing of both synchronous and asynchronous digital inputs such as pulse code modulation (PCM) and MIL-STD-1553 data bus, time, analog, video, ARINC 429, discrete, and RS-232/422 communication data. This digital recording standard will allow use of a common set of playback/data reduction software to take advantage of emerging random access recording media
This standard is set forth by the Range Commander Council (RCC) in which Dewesoft has built this plugin to comply with all the newest revisions of the IRIG standard as they are released to the letter published. No proprietary devaiations have occured within the software to ensure that ALL chp 10 files are possible to be processed through the software without issue.
Two modes of Chp 10 within Dewesoft Software:
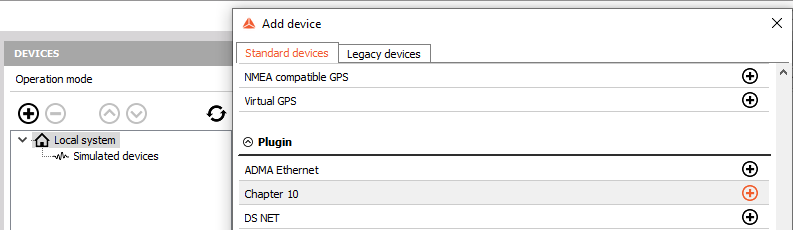
Setting DS into Recorder mode: Options- Settings- Devices
Select the “+” sign and scroll down to select Chp 10
Recorder mode
This mode takes in all the following inputs:
- PCM
- MIL-STD-1553
- Time
- Analag inputs
- ARINC 429
- Discrete
- RS-232/422
In any combination, into the chp 10 plugin recording this data into a chp 10 format. During this as well, a TMATS chp 9 file is also created with this file.
DEWESoft records all this data live and produces the chp10 for immediate useage upon finishing of recording and export to the customers requirements. This will also export DIRECT to external drive per the chp 10 standard.
OUTPUT TYPE- this can be selected to output a chp 10 file OR a Ethernet file. This allows a throughput if needed in ethernet form.
NOTE: You cannot output BOTH chp 10 and ethernet at the same time. Dual instances of Dewesoft software can be ran to allow this. Contact your Dewesoft point of contact applications engineer to accomplish this task.
CALC DELAY- Default is set to 200 ms\, this can be adjusted to user requirements in this area for all settings.
Reproducer Mode
This mode will allow the software to be in a standalone mode and be the chp 10 viewer at any location. No external hardware is required and can be done for free by simply downloading the software from DEWESOFT.com, support, downloads.
This settings will ask similar questions to the recorder mode for inital setups. INPUT TYPE- Chapter 10_- This is telling the software that we are going to take ANY recorded chp 10 file from any source and we are going to use that as the source of data. _Ethernet_- This will allow chp 10 over ethernet to be the source of all data. _Dewesoft channel- Direct channel inputs from another Dewesoft device that is outputting chp 10 or a network of chp 10 devices.
A radio box is located on the right side that will allow the software to share the S/N Registration from a device to be used with that software if additional data is needed or a data merger of chp 10 files, for example, are required.
Calc Delay is inputable by the user at this location and is applicable to all data globally at this point.
Difference between recorder and reproducer modes
When this is selected within the settings, there are follow on actions that occur in the background of the software which will allow and deny certain actions. This is to match the ideal outcome of the action. Such as Recorder will go into a mode that is similar to a non-chp10 application with the software just producing a chp10 AND .DXD file. Reproducer mode is looking from the user a file with all the applicable information to inlcude a TMATS chp 9 file to use.
Can I use recorder and reproducer mode at the same time? While it has been requested and has been developed, please contact your applications engineer and/ or support team to discuss this need. It is available currenttly though your Dewesoft Point of Contact.
Usage of Chp 10 Plugin
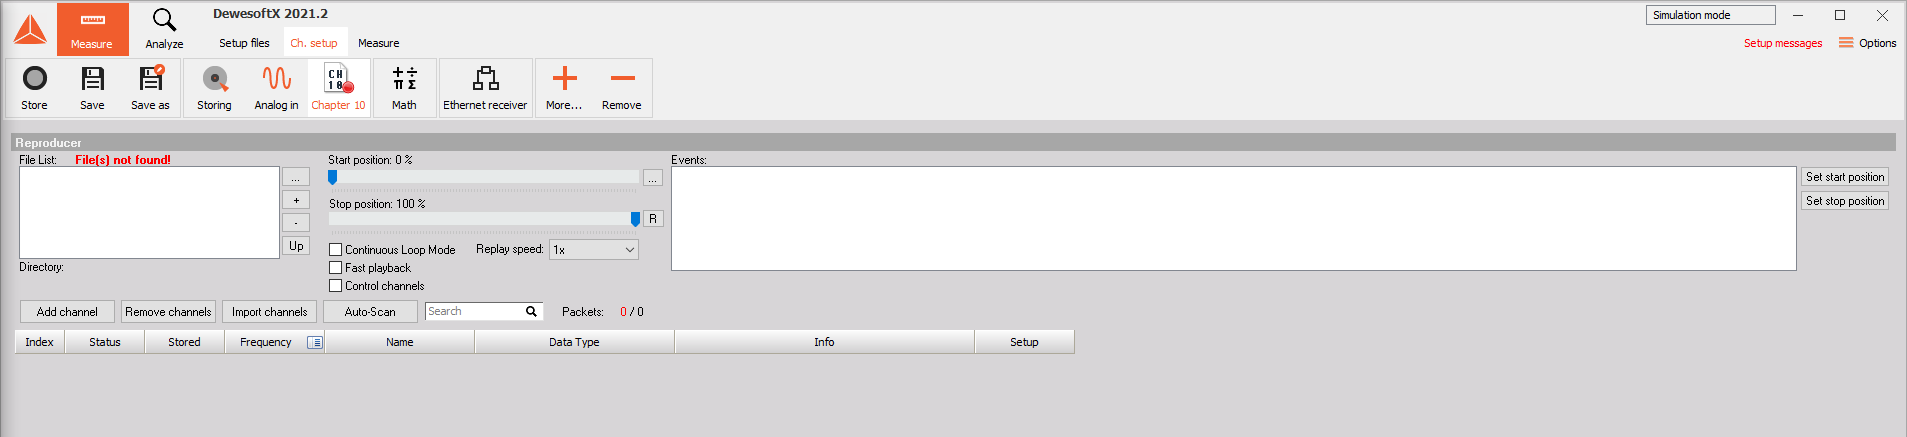
Once the plugin has been configured within the project settings, a new icon will appear on the toolbar within the software:
![]()
Clicking on the new icon will open the chapter 10 settings:
Reproducer Mode Usage
Quick Start Guide
Input type: Chapter 10 File
In this mode, you will import the chp 10 file that you wish to view. This is accomplished by pressing the “+” sign on the screen area shown below. Multiple files can be imported here to create a single chp10.
A seperate windows explorer window will popup allowing you to locate the chp 10 files accordingly. Select the file you wish to import from there.
 UPDATE- You can now drag and drop chp 10 files to this window.
Multi-File Import: When importing multiple files (multi-file) into the software, the software will see the naming convention and combine ALL files and add -MF at the end of the file for a single chp 10 analysis.
UPDATE- You can now drag and drop chp 10 files to this window.
Multi-File Import: When importing multiple files (multi-file) into the software, the software will see the naming convention and combine ALL files and add -MF at the end of the file for a single chp 10 analysis.
If you wish to view individual files from the multifile, you must load them individually into the File List.
Once the file is loaded, you will be able to load in the information by selecting the following options: Auto-Scan: This is the easiest option. When pressed, the software will scan the chp10, create the channels and import all information directly. NOTE: When a file is dragged and dropped into the window autoscan will be automatic NOTE: when uploading new files, you will be promted to rescan, click yes to load the new parameters
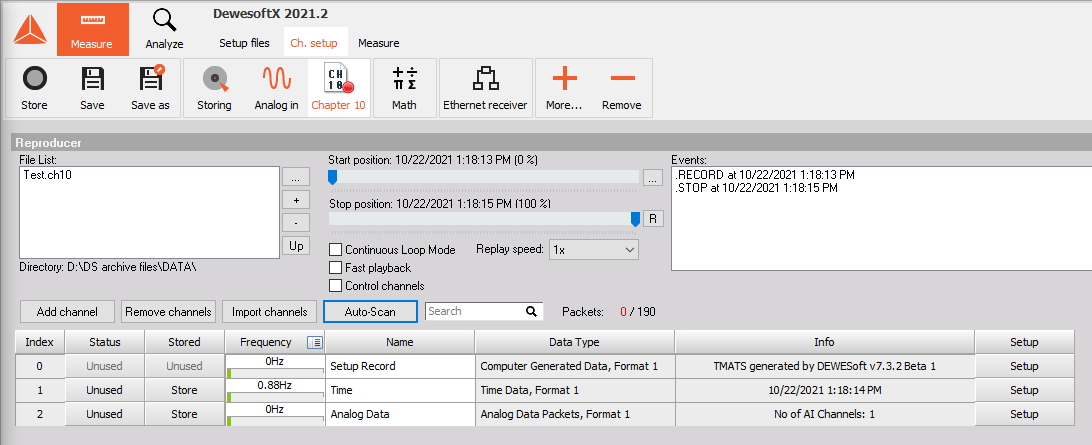
NOTE: Notice that the Events area is now populated with the details of the file loaded to include markers and cursors placed within the file with date and time. You can now change the Status to USED or UNUSED on each channel of interest from this point. Unused is set as default.
By selecting the Setup button, you can view the TMATS form of information. Users can change the channels name and channel ID on the top bar for that channel selected. Export is an option as well on the lower section.
Options for playback:
 Continous Loop Mode: allows the file to replay automatically endlessly.
Fast Playback: Increases the speed to allow faster viewing of larger files
Control Channels: These place the controls listed within here as an option to be used within measure screen to prevent the need to swap between ch setup and measure screen
Replay speed: Allows the user to select the replay speeds
Continous Loop Mode: allows the file to replay automatically endlessly.
Fast Playback: Increases the speed to allow faster viewing of larger files
Control Channels: These place the controls listed within here as an option to be used within measure screen to prevent the need to swap between ch setup and measure screen
Replay speed: Allows the user to select the replay speeds
Once these settings are set, you are now able to move to the measure screen and the channels used will now be an option on the right to view as the user sees fit.

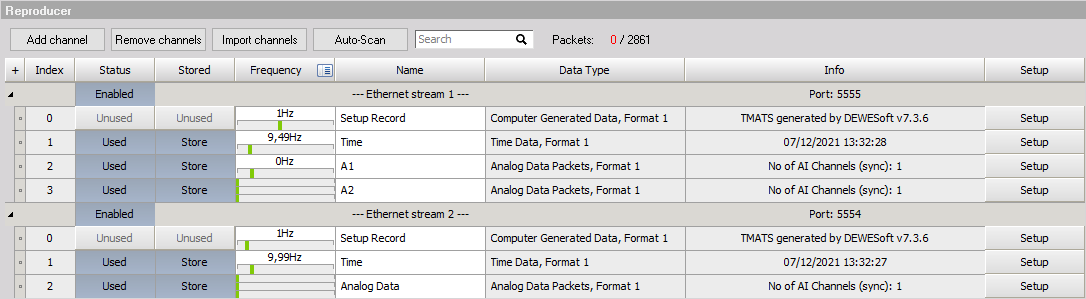
Input type: Ethernet
In this mode, you can receive data which is captured by another setup and is sent over the Ethernet using the Recorder option. In the settings window you define the IP address and a port, where the data is sent by recorders. Multiple Ethernet streams can be defined.

Use option Auto-Scan to automatically find transmitted channels over defined streams. You can as well add them manually or import them. Each channel can be toggled between Used and Unused, as well as between storing and not storing the data. Steams can be Enabled or Disabled.
NOTE: At least one stream has to be Enabled at any given time. If all streams are disabled, you need to disable the plugin as the clock provider in the settings menu.
Additional settings
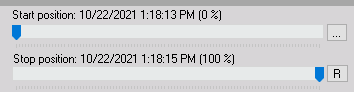
Start and Stop positions can be set here to focus on specific areas of data or to set start and stop areas of interest.
You can click and drag the blue cursor to set both points. The three dots next to the start bar allows the user to set specific start and stop times in absolute time. The “R” next to the stop bar allows a full rescan from these points.
 The events area show any and all events that have occured within the file to include markers (in any form) and losses that may have occured durting the recording of data. Data loss points will show all details in the event that occurs. Users can also set Start and Stop points with the options on the right side allowing the abilty to focus on areas of interest based upon event information.
 These buttons allow the user to add channels, remove channels, import channels and auto-scan files. Search bar allows quick lookups for larger data files. Packets show the invalid packets over total packet count.
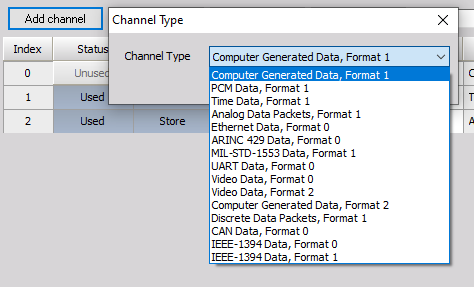
 Add Channel: This will allow the user to add one of the following channels to an existing file or create a new channel within.
 Remove Channel: By selecting the channel from the list below the option, you can simply click to remove that channel from the file. If this is clicked by accident, simply Auto-Scan will return that channel from the file.
Import Channel: Clicking this will open a windows explorer option that allows the user to select the TMATS or chp 10 they wish to import into this parent file.
Auto-scan: Autoscans the files loaded in the top left and populates the channel list with the contained information
Search: simply type the parameter of interest and this will highlight the infomation within the channel list below.
Packets: This is showing the dropped or corrupt packets to the chp 10 standard over packets processed.
Remove Channel: By selecting the channel from the list below the option, you can simply click to remove that channel from the file. If this is clicked by accident, simply Auto-Scan will return that channel from the file.
Import Channel: Clicking this will open a windows explorer option that allows the user to select the TMATS or chp 10 they wish to import into this parent file.
Auto-scan: Autoscans the files loaded in the top left and populates the channel list with the contained information
Search: simply type the parameter of interest and this will highlight the infomation within the channel list below.
Packets: This is showing the dropped or corrupt packets to the chp 10 standard over packets processed.
Recorder Mode Usage
Setup Guide
In the project settings (Options, settings, select chp 10 under local system), the ability to swap will be present under Device Type.

NOTE: ensure that under general settings, the use of external time is selected (if required) when using any external time source such as IRIG.

The Dewesoft software will now be into a recorder mode and the chp 10 tab will change apperance to allow the user to select which channels they wish to add into a chp 10 along with settings.
 Adding a channel: Select the Add Channel button and a dialog box will appear to select the format.
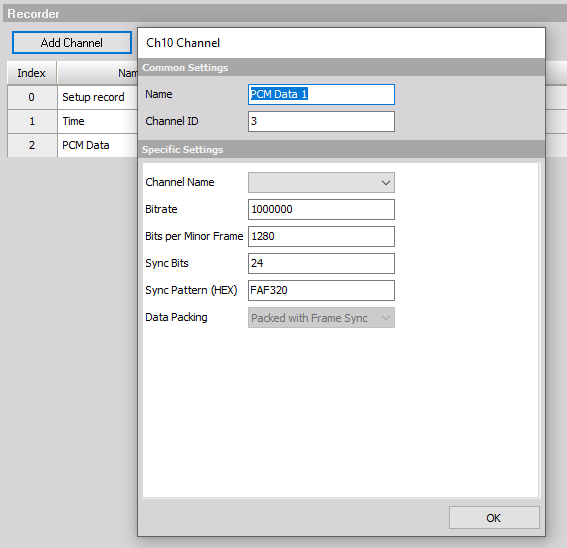
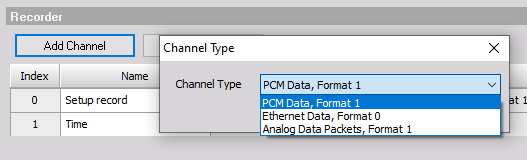 When you select the PCM channel. An additional box will appear to enter the details required for PCM stream.
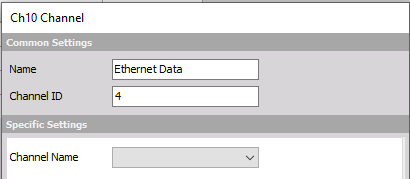
 Selecting the Ethernet channel will open the following settings. Channel name is attached to the ethernet reciever channel
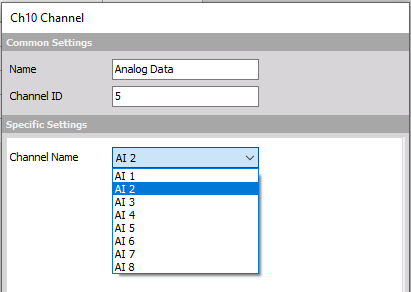
 When adding just analog channels, the analog data packets option will allow the user to select which analog channel to record as chp 10.
Once these channels are setup, you are now collecting data in chp 10 format.
FAQs
- Time error present Solution: Ensure that the “use external clock source time” is checked within the project settings, Chapter 10, General settings, last radio box. This error is present when using external time such as IRIG or NTP for example. This ties the chp10 to the external time.