File cleaner
Introduction
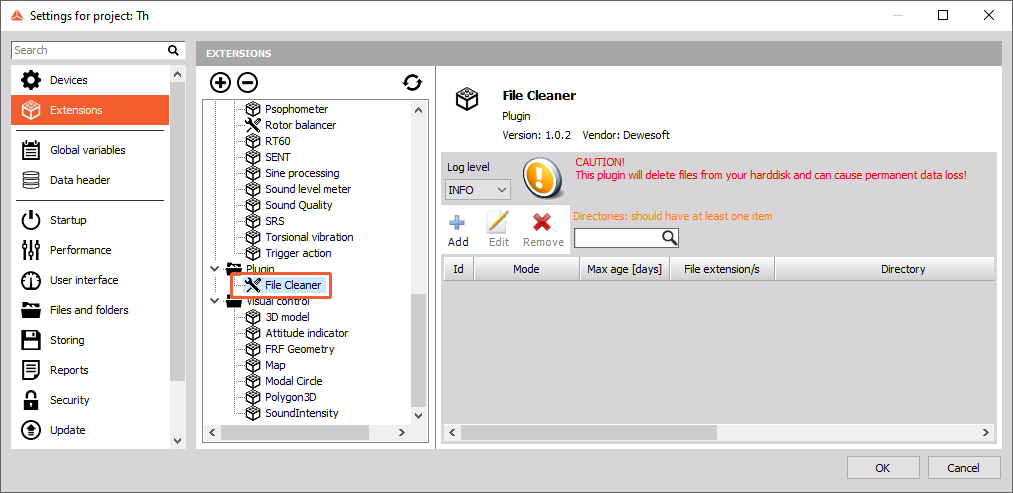
The File Cleaner is a plugin which can be configured to automatically delete old files in definable directories.
In the Extensions section look for the node named File Cleaner. If the File Cleaner cannot be found, the plugin have not been installed yet. The installation procedure is explained under Add extension installation procedure.
When the File Cleaner plugin is installed and selected under Extensions section, the settings for the plugin are shown on the right side of the Extensions window.
Log files
The plugin will write log files during operation. The amount of log messages is configurable via the Log level drop down box in the Hardware setup. The name of the logfile is FileCleaner.log. When the plugin is started, it will immediately start to log to the windows temporary directory. As soon as the DEWESoft® application is available to the plugin, all subsequent logs will be written to the standard DEWESoft® log directory (e.g. D:\DEWESoft\System\Logs).

Note: There is also a log file called FileCleaner.dll.log in the AddOns directory. This will normally be empty. It will only contain messages when there is a bug very early in the AddOn initialization.
Log levels
With the log level drop down box you can set the detail level of the logging function. If you set a high log level (e.g. TRACE, ALL) a lot of log messages will be written and the logfiles will roll over quite often. This is also dependent on the sample rate – the higher the sample rate is, the more often data will be fetched and thus more log messages will be written.
| Log Level | Description |
|---|---|
| Error | Will only log error messages |
| Warn | Will also log warning messages |
| Info | Will also log info messages – this is recommended for production use |
| Debug | Will also log debug messages |
| Trace | Will also log trace messages |
| All | Will log all messages |
Toolbar
The toolbar has the following buttons:
- Add: Will add a now row with a directory definition to the grid
- Edit: Will open the Directory Definition Dialogue for the Directory Definitions that are currently selected in the Directory Definitions: Grid. Hint: you can also double click a row in the Directory Definitions: Grid to open the Directory Definition Dialogue
- Remove: Will remove the Directory Definitions that are currently selected in the Directory Definitions: Grid.
Search Box
If you enter a search term only the rows in the grid which contain this search term in any cell will be shown.
Directory Definitions: Grid
The Grid shows a list of all defined Directory Definitions.
| Column | Information |
|---|---|
| Id | This is just a unique consecutive number to identify the row of the grid.If there are any warnings or errors in this Directory Definition, then the background colour will turn orange or red. |
| Max age [days] | This is the maximum age (in days) of the files in the directory. Older files will be deleted by the plugin.Note: the plugin will only run once per day – thus it might take almost one day longer before your files are actually deleted. |
| FIle extension/s | Shows a list of all file-extensions that will be processed: i.e. only files with these extensions will be deleted (if they are older than Max age [days]). |
| Directory | This is the directory that will be processed: i.e. all files that are found in this directory and any of its subdirectories, that have one of the File extension/s and are older than Max age [days] will be deleted. |
| Subdirs | If subdirectories are also searched or not |
Directory Definition Dialogue
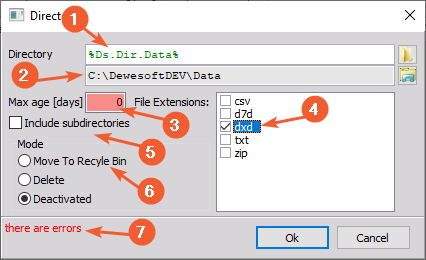
- Directory input: Enter the directory path
- Directory: only files that are stored in this directory or any of it’s subdirectories will be processed.
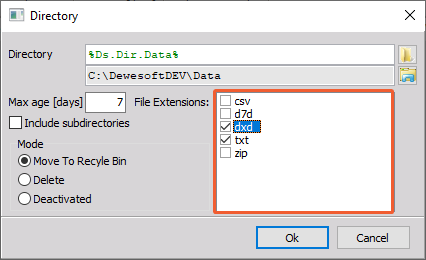
- Max age [days]: only files that are older (the file modification date is relevant) than the specified number of days will be processed
- File Extensions: only files with one of the selected extensions will be processed
- Include subdirectories: if this box is checked, also all subdirectories will be searched for matching files and also those files will be deleted.
- Mode: the Mode defines the action that will be taken for the specified files:
- Move To Recycle Bin: the specified files will not be deleted directly, but they are moved to the Windows Recycle Bin. This gives you an opportunity to recover accidentally deleted files and restore them to their original locations. Note that the Windows Recycle Bin does not guarantee that you can restore all files (i.e. if the Recycle Bin reaches its maximum size old files will be deleted automatically): Please consult the Windows Help for details about the Recycle Bin feature.
- Delete: the specified files will be deleted.CAUTION: The files will be deleted immediately. There is no way to restore the files. Use with care!
- Deactivated: In this mode the Directory Definition will simply be ignored – no files are deleted or moved to the Recycle Bin. You can use this mode to temporarily disable a Directory Definition (it is also useful for debugging).
- Status label: may show errors/warnings
Directory
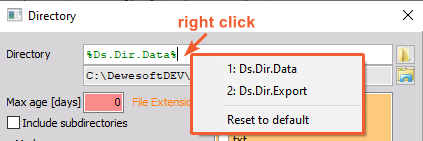
In the directory input box you can either enter a full directory path manually, or you can click on the Select Directory icon to open a standard Windows folder selection dialogue.When you click the the Open location in Windows Explorer icon, a Windows Explorer will be opened and show the directory. Instead of absolute paths, you can also use 2 DEWESoft® variables:
Ds.Dir.Export: will be expanded to point to the current DEWESoft® export directory.
Ds.Dir.Data: will be expanded to point to the current DEWESoft® data directory.
You can type the variables manually (they must be surrounded by percent signs) or you can right-click into the Directory input field, to bring up the pop-up menu (3). Then you can either click one of the pop-up menu items or press a number on the keyboard (e.g. 1 for the first item). Then the variable will be inserted at the cursor position of the Directory input field. You can also append text to the variable.
Note: when you enter an absolute path directly, then the result text-box will show the same text as the Directory input text-box.
Custom File Extensions
Note: This section refers only to Dewesoft® 7.
Per default you can select the following file extensions in the plugin: *.csv, *.d7d, *.dxd, *.txt, *.zip
If you want to allow less or other file extensions, then you can specify a list of file extensions in the DEWESoft® Setup7.ini file. The Setup7.ini file is located in the DEWESoft® system folder e.g. D:\DEWESoft\System\X3\Setup7.ini.
To specify a custom list of file extensions open the Setup7.ini file in a text-editor and add the following lines: [FileCleanerAddOn] Extensions=csv/d7d/xls The first line is called the ini-file section. It is named FileCleanerAddOn and must be surrounded by square brackets. The second line is a key-value pair. The name is Extensions followed by an equals sign (assignment operator) and the last part is the file-extension list. The extensions must be separated by a forward slash and must not include a dot (.). In the example above only the file-extensions *.csv, *.d7d, *.xls will be available.
Before you change the Setup7.ini file, you should close DEWESoft®.
Channel Setup
The File Cleaner AddOn does not have any channel related settings.