GPS module on device
This manual explains how to check GPS reception, configure navigation channels, view measurements, and prepare a recording in DewesoftX with an OBSIDIAN-R8w device.
The instructions use the Config, GPS, Navigation 1, and Live view labels shown in this software version. Other receivers and versions may expose different controls. This guide covers the GPS module in the connected device view; it does not cover standalone logger storage configuration or external RTK receivers.
Quick start
- Connect the GNSS antenna to the device’s designated antenna connector. Place the antenna outside with an unobstructed view of the sky. On a vehicle, a roof location is preferable to a position behind bodywork.
- In the device tree, select device in this case OBSIDIAN-R8w.
- Open Measure → Config → GPS → Navigation 1.
- Check Used satellites, NMEA status, and the changing UTC time. Confirm that position values are plausible for the test location.
- Turn on Used for the navigation channels required by the test.
- Review Reset distance and Detect standstill before the run.
- Open Live view, select a display widget, and assign the required channels from openDAQ → OBSIDIAN-R8w → Navigation 1.
- Check the intended recording destination and device logging configuration before pressing Start. After stopping, open the resulting data file and verify that it contains the required GPS channels.
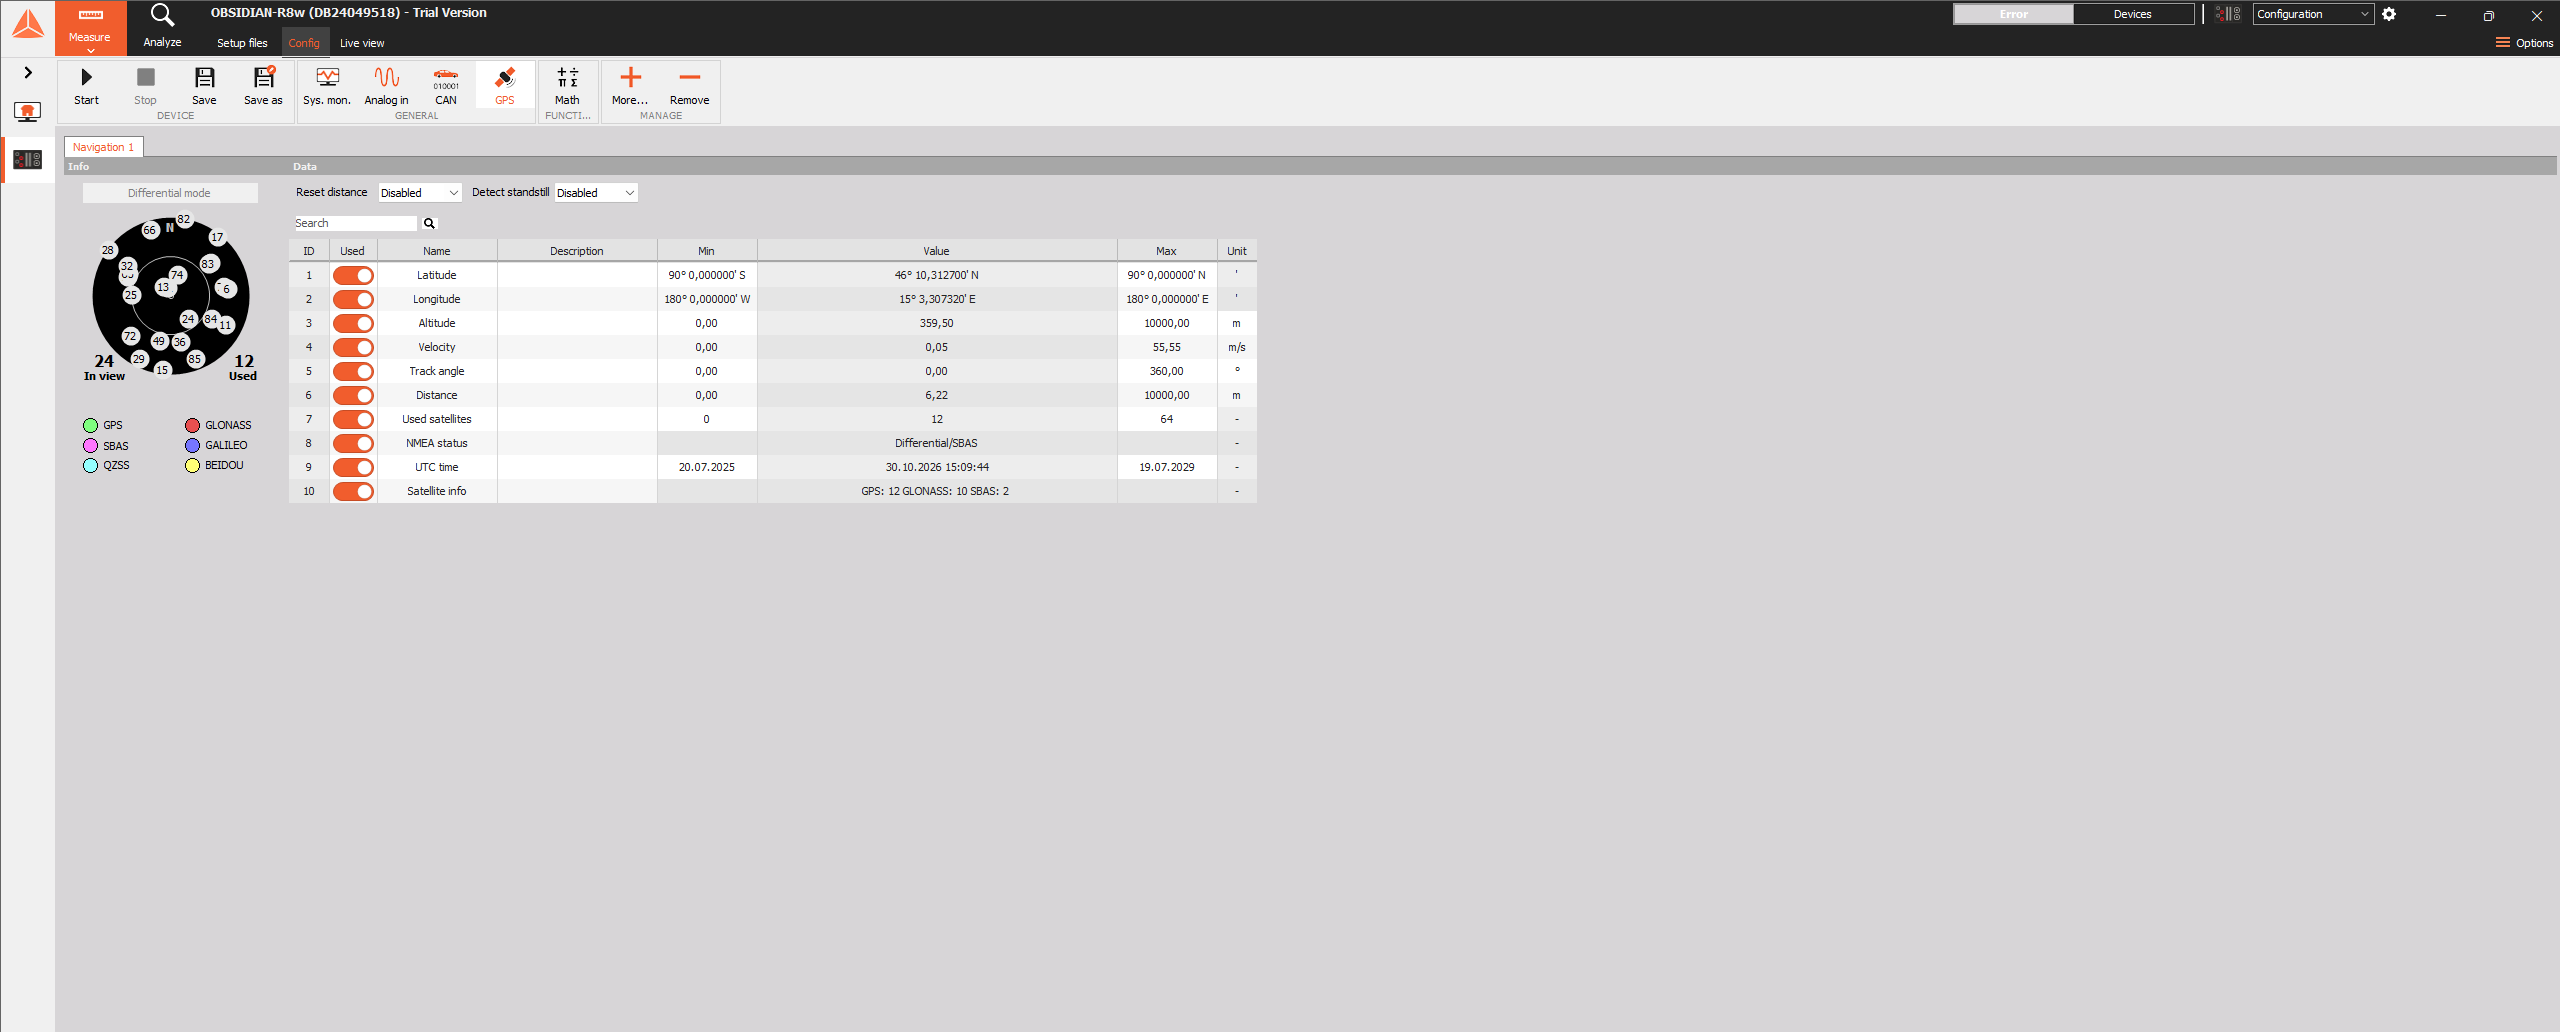
Figure 1. The connected OBSIDIAN-R8w with Config and the GPS module selected. The device Start, Stop, Save, and Save as controls are at the upper left.
Understanding the GPS page
The Info area on the left contains a satellite sky plot, counts of satellites In view and Used, and a color legend for satellite constellations. Satellites in view are not necessarily all used in the navigation solution.
The Data area contains the distance and standstill options, a search field, and a signal grid. Use the search field to locate a channel; clear the search to see the full list again.
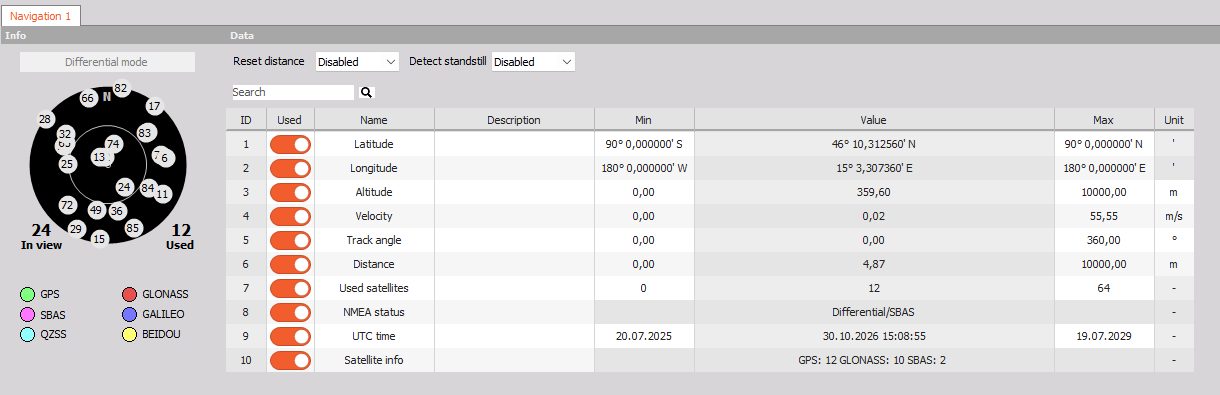
Figure 2. Navigation 1 showing the two configuration options, satellite information, and all ten navigation channels. Values in screenshots are examples from the inspection.
Check reception before a run
Allow the receiver to obtain a solution after power-up or an antenna move. Check reception at the actual test location, rather than relying on a previous successful fix.
- Used satellites reports the satellites used in the solution. Satellite count alone does not establish measurement accuracy.
- NMEA status reports the solution category.
- UTC time should continue to advance. UTC differs from the computer’s local time zone.
- Latitude, Longitude, and Altitude should be plausible.
Small nonzero velocity values can occur while the antenna is stationary. Assess low-speed behavior and distance accumulation before a test that depends on very small movements.
Configure navigation data
Reset distance
The Reset distance list has these options:
| Option | Use |
|---|---|
| Disabled | Do not request an automatic distance reset through this setting. |
| On start | Request a reset when starting a run. Verify that Distance begins at zero in a short trial before using it for a measured route. |
Detect standstill
The Detect standstill list offers Disabled and Enabled. Standstill detection is intended to handle stationary conditions and reduce the effect of low-speed noise.
Select and label channels
Use the Used switch in each grid row to include the required signal in the measurement setup. All ten navigation channels were enabled and reported as stored in the inspected configuration. This does not mean a recording is currently running.
The grid exposes editable Name, Description, and, where applicable, Min, Max, and Unit cells. Use clear descriptions for the test. Treat Min and Max as configured channel limits, not as measured extrema or receiver accuracy specifications.
Navigation channel reference
| Channel | Unit or display | Meaning and use |
|---|---|---|
| Latitude | Degrees and minutes with N or S; channel unit ' |
North–south position. Raw numeric coordinates use angular minutes. |
| Longitude | Degrees and minutes with E or W; channel unit ' |
East–west position. Raw numeric coordinates use angular minutes. |
| Altitude | m | Receiver-reported height. |
| Velocity | m/s in this setup | Speed of movement. |
| Track angle | ° | Direction of travel, with 0° representing north. It is not a stationary vehicle heading measurement. |
| Distance | m | Accumulated traveled distance calculated from velocity. Check reset behavior and stationary drift. |
| Used satellites | Count | Number of satellites used in the navigation solution. |
| NMEA status | Named status in the grid | Navigation solution quality category. |
| UTC time | Date and time | Receiver time in UTC. Apply the appropriate time-zone conversion when comparing with local timestamps. |
| Satellite info | Constellation summary | Information about visible satellite systems. The example shows GPS, GLONASS, and SBAS counts. |
Coordinate conversion
The grid formats coordinates as degrees and minutes, while Dewesoft’s GPS documentation describes raw coordinate values in angular minutes. Check export formatting before using the numbers in mapping software.
For a coordinate shown as 46° 10.312860′ N:
Decimal degrees = 46 + 10.312860 / 60
                = 46.171881
For a raw value expressed entirely in angular minutes, divide by 60. North and east are positive; south and west are negative. Check latitude and longitude order when importing into another application.
View and record GPS data
Live view
- Select Live view at the top of the window.
- Select the widget that should show the navigation data, or use Widgets to add a suitable display.
- In the right-hand Channels panel, expand openDAQ → OBSIDIAN-R8w → Navigation 1.
- Assign the required navigation channels to the selected widget. A numeric display is useful for position and status; a recorder is useful for velocity and distance over time.
- Check labels, units, and axis scaling. A moving plot or changing number confirms live display activity, not successful file storage.
Record a test
The connected device interface shows Start and Stop under DEVICE. Treat these as device acquisition or logging controls, and check the device’s storage configuration before use. The GPS page does not establish the destination or storage policy for a standalone recording.
- Confirm the required channels are enabled and that GPS reception is suitable.
- Verify the recording destination, available space, file naming, and storage mode in the applicable device configuration.
- Save the configuration using Save or Save as if it should be retained for future runs.
- Press Start when ready. Confirm that the device indicates active acquisition and storage as intended.
- Monitor fix status during the run. Note interruptions such as tunnels or loss of antenna visibility.
- Press Stop at the end of the run and allow file finalization to finish.
- Retrieve the resulting recording using the device’s configured workflow. Open it in Analyze, then verify channel presence, duration, UTC time, and continuity.
Troubleshooting
| Symptom | Checks and next action |
|---|---|
| No fix or poor reception | Check the antenna connection and move the antenna outside with a clear sky view. Allow time to reacquire satellites. |
| Satellites visible but position unreliable | Check NMEA status and the number used in the solution. Reposition away from obstructions and reflective structures, then compare with a known location. |
| Distance increases while stationary | Observe Velocity. Review Detect standstill and validate its behavior in a short trial. |
| Distance does not start at zero | Review Reset distance. If using On start, inspect the first recorded Distance value in a trial run. |
| GPS channel missing from a widget | Check Used on the GPS page, clear channel search filters, and expand Navigation 1 in the Live view channel tree. |
| Data is visible but no recording exists | Check device storage configuration and active storage indication. Live display activity alone does not prove storage. |
| Position is displaced after export | Check degrees versus angular minutes, hemisphere signs, and latitude/longitude order. |
| Time differs from the PC clock | Compare UTC with the computer’s local time zone and daylight-saving setting. |
Before leaving the test site
- Confirm a usable fix and plausible position.
- Confirm the required GPS channels are enabled.
- Check coordinate units, velocity units, distance reset, and standstill behavior.
- Confirm that a recording was stored and can be opened.
- Review a short interval for missing data or fix interruptions.
- Retain the configuration needed to repeat the test.