Amplifier Settings
You can find amplifier settings on the left side of the Channel setup menu, below Channel settings. There are three tabs:
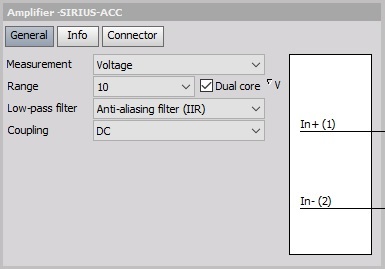
You can see the module type, serial number and revision number in the section name.
Example: SIRIUS-ACC
At Dewesoft, we produce many series and special modules, such as:
- SIRIUS® (ACC, ACC+, CHG, CHG+, HV, LV, LV+, MULTI, STG, STG+, STGM, STGM+, R2DB, R2D, R3, R8, R8D, R8DB, Mini, HD-LV, HD-STG, HS-ACC, HS-ACC+, HS-CHG, HS-CHG+, HS-HV, HS-LV, HS-LV+, MULTI, HS-STG, HS-STG+)
- DEWE-43 (8 Analog inputs, 8 Super counters, 2 CAN bus port)
- DS-NET (DS-GATE, DS-NET CPU, ACC2, CFB2, BR4, V8, V8-200, V4, V4-HV, TH4, TH8, DIO8)
- KRYPTON (8xTH, 16xTH 4xLV, 8xLV, 3xSTG, 6xSTG, 8xRTD, 16xDI, 16xDO, 8xDI, 8xDO, KRYPTON CPU)
- CAN interfaces (DS-CAN2), SIRIUSim 4xCAN, SIRIUSif, 8xCAN
NOTE: For more information regarding Dewesoft devices and module configurations, please refer to our webpage.
General
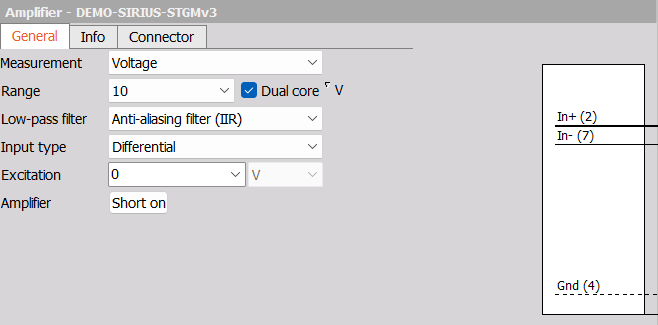
You can modify the following amplifier settings:
- Measurement - Voltage, Bridge, Current, Potentiometer
- Range - Select the range from the dropdown list, disable Dual core (enabled by default), select whether you want to Show amplifier or scaled range.
- Low-pass filter - Choose the type of filter from the dropdown list or disable it.
- Input type - Differential or single ended.
- Excitation - If you are using the amplifier for sensor excitation, select the excitation value from the dropdown menu.
- Amplifier - Use the Short on feature to check the amplifier’s offset.
Info
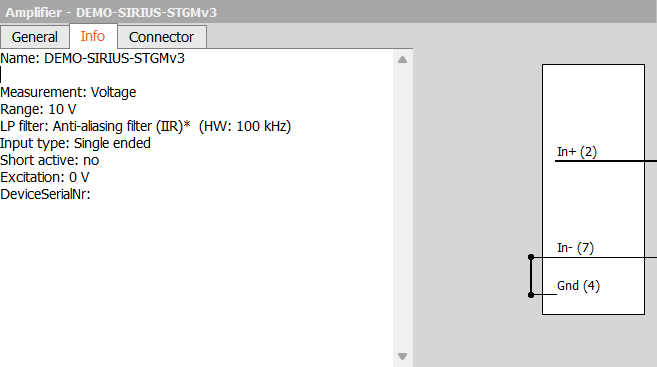
In this tab, you will find all important amplifier information. You can copy and paste this text outside of DewesoftX if needed.
Connector
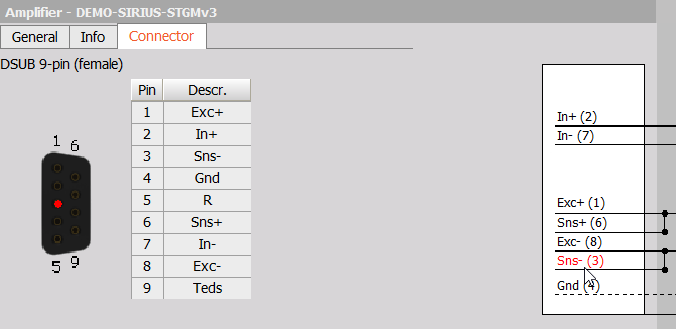
You can see which connector on the Dewesoft device is used, as well as its pinout. If you click on a pin in the table, a red dot will show where it is on the connector diagram. If you hover over a signal on the connection schematic, a red dot will also appear on its pin on the connector.