Channel setup
Setup messages / channels
Add messages/channels manually - Can channel setup
To add a message manually simply click on the Message and then the Add button.

Setup window will automatically open for the new message:
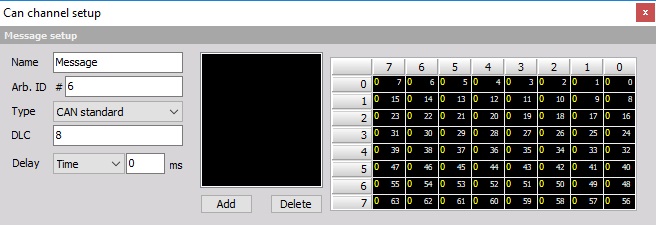
Message setup
The upper left area of the window is used to define the CAN message.
Before you add any channels you have to define the message itself:
- Name - The name of the superior message.
- Arb. ID # - ID number of your message on the CAN bus
- Type - Select between CAN standard and CAN extended from the drop-down list. Those two differs in identifier length - standard length is 11 bits and extended is 29 bits.

- DLC - DLC is the length of the message. It ranges from 1 to 8. As a standard, the DLC is set to 8.
- Delay - we can also enter the message delay in millisecond which shifts the time stamp of the message back in time. This can be used to perfectly synchronize the analog data the with CAN data with compensating the delays in digital data transmission.
Signal setup
Now we are ready to define our CAN channels within the message. Press the Add button in the Can channel setup window to create a new channel.

Press the Delete button to remove the selected channel.


The Signal setup offers a lot of settings:
- Name - name of the channel (signal within the message)
- Unit - unit of the signal
- Color - color of the signal on displays and lists - color selector
- Data format - select between Intel (little endian) and Motorola (big endian) format from drop-down list:

- Data type - select between Unsigned (only positive integer number), Signed (integer number where the first bit is the sign) and IEEE Float (floating point number) from the drop down list:

- Start bit - this value indicates the start of your signal within the message
- Length (bits) - this value defines the number of bits used for this channel
- Factor, Offset - like in the analog world, you can define offset and scale the CAN value to the physical value - scaling Factor, for example 0 to 100 % or 10 to 50 mm
- Maximum/minimum - depending on the settings above, the maximum and minimum possible values are displayed. With selecting the Auto button this values can be set automatically. When you use only a small range out of it, you can decrease the display range.
In addition to the signal settings, you have an online display of Current unscaled value and Current scaled value in lower right part of Signal setup area.
The currently available signals within the message are also displayed in the array on the upper area of the window to get a fast overview of your message:
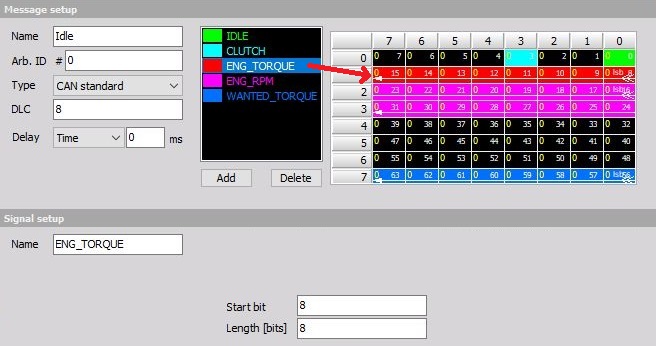
In this fields array, the running number of bit is displayed on right side of the field. The start bit is designated with double arrow, end bit with the simple arrow and both arrows are connected with a white line, which represents Length of the signal.
Example: CAN channel setup after defining several signals within one message
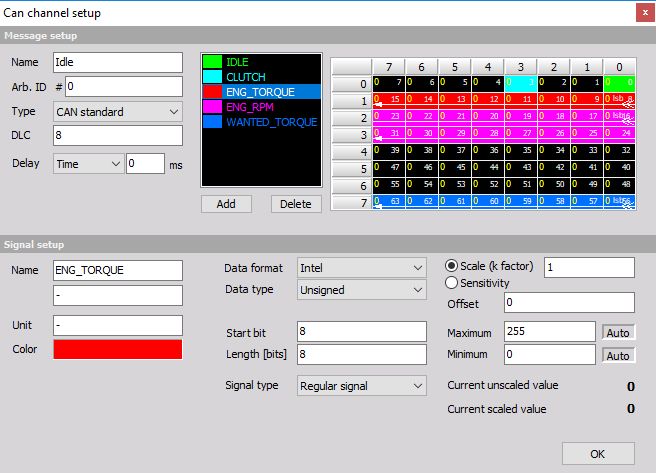
After you have defined all signals (channels) within your message, press the OK button to confirm and to leave the message setup. Two added channels will appear under the message on Message/channel list (if we expand the message to show also the channels).

Edit messages/channels
To edit CAN messages or channels simply press the appropriate Setup button; you will receive the same CAN channel setup window that is already described above. Now you can do the required changes and confirm them pressing the OK button.
For information about message setup see above -> Message setup.
For information about channels setup see above -> Signal setup
Delete messages/channels
To delete CAN messages or channels, simply press the Remove button.

Message/channel list
After you have defined all signals (channels) within all messages or you have import messages from the *.dbc file, all these messages appear on Message list or Channel list (channel overview) on the lower area of CAN setup window.
View options
These options enable two different views on message/channel list:
1. Messages list (view)
| With selecting |  |
View button list of defined CAN messages appears: |

Columns that are shown in your CAN messages list:
EXP - to display/hide channels of particular message.

Use the button in this column to display all channels of this message and channel list will have the following appearance:
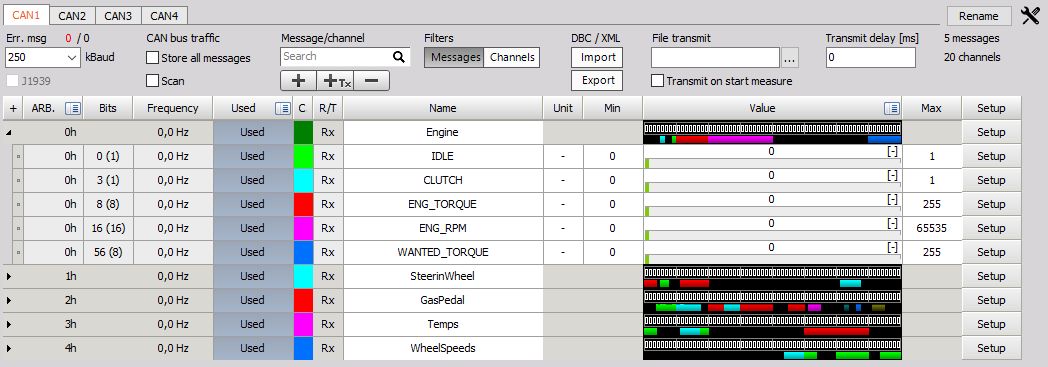
| The |  |
button will change to a |  |
button and can be used to hide channels. |
ARB.
- Shows the arbitration ID and refresh rate of the specific message.
Values can be displayed in Hexadecimal or Decimal form, use
![]()
icon and select the desired form from displayed the drop-down list.

ON/OFF
- To activate/deactivate CAN messages or channels for online display and storage.
Select messages/channels for online display.
Press the Unused button - it will change now to Used - to set the desired messages or channels active for CAN data acquisition and they are available in all instruments either as digital values or graph.
To activate all messages and channels, at the same time, click on the
![]()
icon or right-click into title On/off field at the top of this column and use Select all to activate all messages and channels or Deselect all to deactivate them.
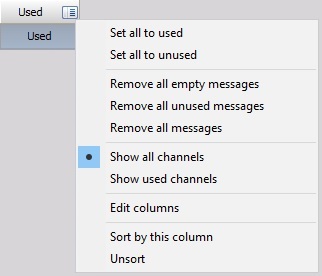
NOTE: Be aware that activating a message does not automatically activate the appropriate channels!
With that function, we can store whole messages without displaying or storing the channels itself.
After you have selected the required channels, you can hide the unused messages channels, automatically.
Simply click on the icon in On/off field at the top of the list again and select Show used channels. Or select Show all channels to display also the unused messages and channels again.
![]()
- C - channel color selector
- Name - CAN message (channels) name - just click on the NAME field and you can enter the new name as usual text.
- Value - current CAN messages / channels value. As a standard, the setup displays the current data transfer on the CAN bus in a binary format. Click on the CAN message menu Icon or right-click into title VALUE field at the top of this column to change the data format from Binary to Hexadecimal - simply select in the list.

Example: displays the current data transfer in hexadecimal form

- Setup - CAN message (channels) settings. After selecting Setup button CAN channel setup window will automatically open. Now you can do the required message setting changes and confirm them pressing the OK button.
For information about Channel grid see -> Setup -> Channel grid.
2. Channels list (view)
| With selecting |  |
view button list of defined CAN channels appear: |

Columns that are shown in your CAN channels list are similar as in Messages view, except:
- Name - CAN channels name - just click into the NAME field and you can enter the new GPS channel name as usual text.
- Value - current CAN channels value and unit
- Setup - CAN channels (message) settings (see below). After selecting Setup button CAN channel setup window will automatically open for entering required channel setting changes:
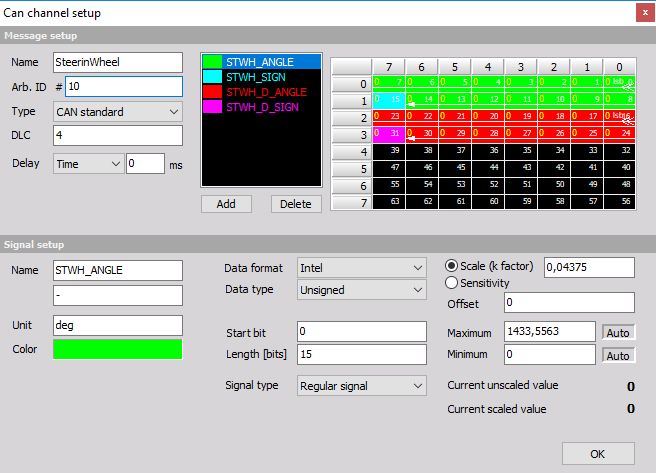
This window is the same as for changing message setting (in Name field appear Message name), only it will automatically display the current selected channel. Here can be set also other channels in this Message.